Quantcast
Channel: Planet PostgreSQL
Viewing all 9640 articles
Browse latest View live

Gilles Darold: PostgreSQL 15 will include some more regexp functions

$
0
0

While migrating from other databases like Oracle to PostgreSQL, we may come across some functionalities that may be only available with a complex work-around. At MigOps, we have migrated many customers from Oracle to PostgreSQL and I have personally seen many scenarios where direct equivalent is not possible. One of them was while working with regular expressions. There are many regexp functions that are currently supported by PostgreSQL. However, there are some regexp functions that are currently missing. For this reason, I have contributed to a patch and with that, PostgreSQL 15 will include some more regexp functions. In this article, I am going to talk about new regexp functions that will be seen in PostgreSQL 15.

Currently existing regexp functions until PostgreSQL 14

Historically in PostgreSQL, there were a bunch of functions supporting POSIX regular expressions. Actually the total count was six as seen in the following section :

  • substring ( string text FROM pattern text ) => text
    Extracts the first substring matching POSIX regular expression
  • regexp_match ( string text, pattern text [, flags text ] ) => text[]
    Returns captured substrings resulting from the first match of a POSIX regular expression to the string
  • regexp_matches ( string text, pattern text [, flags text ] ) => setof text[]
    Returns captured substrings resulting from the first match of a POSIX regular expression to the string, or multiple matches if the g flag is used
  • regexp_replace ( string text, pattern text, replacement text [, flags text ] ) => text
    Replaces substrings resulting from the first match of a POSIX regular expression, or multiple substring matches if the g flag is used
  • regexp_split_to_array ( string text, pattern text [, flags text ] ) => text[]
    Splits string using a POSIX regular expression as the delimiter, producing an array of results
  • regexp_split_to_table ( string text, pattern text [, flags text ] ) => setof text
    Splits string using a POSIX regular expression as the delimiter, producing a set of results

I am not including any examples of how to use these functions in this article as I am only going to talk about the PostgreSQL 15 features surrounding new regexp functions. Meanwhile, you could see the PostgreSQL documentation for more understanding of these existing regexp functions.

Although there was a limited number of functions, they allow us to perform most of the common work with regular expression in SQL queries or stored procedures.

But what if you want to count the number of times a pattern is found in a string? Or the position of the pattern in the string ? Or you want to start the pattern search at a specific position in the string ? That's not too difficult to code using the PostgreSQL functions but the query becomes less readable. Now suppose that you want to work only on the Nth occurrence of a pattern matching, that becomes much more complicated.

The SQL standard XQuery specification since 2008 define some other regexp functions with the LIKE_REGEX predicate and the OCCURENCES_REGEX, POSITION_REGEX, SUBSTRING_REGEX and TRANSLATE_REGEX functions. They are better known under the name of REGEXP_LIKE, REGEXP_COUNT, REGEXP_INSTR, REGEXP_SUBSTR and REGEXP_REPLACE. These are the common names used in most RDBMS or other software using the XQuery specifications.

Until now, REGEXP_SUBSTR and REGEXP_REPLACE were not available in PostgreSQL but existing functions regexp_match(es), substring and regexp_replace can be used to implement the missing functions. This can be a complicated work especially to code the Nth occurrence behaviour,  considering the performances loss compared to a native implementation. I understand the effort it needs very well as I have implemented these plgsql functions in orafce for Oracle compatibility.

New regexp functions in PostgreSQL 15

To extend the possibilities to play with regular expression in PostgreSQL, I have implemented the following new regexp native functions. They will be available in PostgreSQL 15.

  • regexp_count ( string text, pattern text [, start integer [, flags text ] ] ) => integerPostgreSQL 15 regexp functions
    Returns the number of times the POSIX regular expression pattern matches in the string
  • regexp_instr ( string text, pattern text [, start integer [, N integer [, endoption integer [, flags text [, subexpr integer ] ] ] ] ] ) => integer
    Returns the position within string where the N'th match of the POSIX regular expression pattern occurs, or zero if there is no such match
  • regexp_like ( string text, pattern text [, flags text ] ) => boolean
    Checks whether a match of the POSIX regular expression pattern occurs within string
  • regexp_substr ( string text, pattern text [, start integer [, N integer [, flags text [, subexpr integer ] ] ] ] ) => text
    Returns the substring within string that matches the N'th occurrence of the POSIX regular expression pattern, or NULL if there is no such match

And I have also extended the following functions to allow a start position to be used and a matching occurrence or sub-expression for regexp_replace :

  • regexp_match ( string text, pattern text [, flags text ] ) => text[]
    Returns substrings within the first match of the POSIX regular expression pattern to the string;
  • regexp_matches ( string text, pattern text [, flags text ] ) => setof text[]
    Returns substrings within the first match of the POSIX regular expression pattern to the string, or substrings within all such matches if the g flag is used
  • regexp_replace ( string text, pattern text, replacement text [, start integer ] [, flags text ] ) => text
    Replaces the substring that is the first match to the POSIX regular expression pattern, or all such matches if the g flag is used
  • regexp_replace ( string text, pattern text, replacement text, start integer, N integer [, flags text ] ) => text
    Replaces the substring that is the N'th match to the POSIX regular expression pattern, or all such matches if N is zero;

For example, the following syntax is used until PostgreSQL 15 :

SELECT * FROM contact 
WHERE (regexp_match(email, '^(pgsql-[^@]+@[^.]+\.[^.]+.*)', 'i'))[1] IS NOT NULL;

With PostgreSQL 15, you can now use the following syntax implementing regexp_like :

SELECT * FROM contact 
WHERE regexp_like(email, '^pgsql-[^@]+@[^.]+\.[^.]+.*', 'i');

Or to count the number of time a sting is matching a pattern, following syntax is used until PostgreSQL 14 :

SELECT count(*) FROM regexp_matches( documents, '(postgresql|postgres)', 'ig');

But with PostgreSQL 15, it can be simply written as seen in the following command.

SELECT regexp_count(documents, '(postgresql|postgres)', 'ig');

Let us consider that you are looking to fix data import with an attribute containing multiple values character and you want to remove the 4th occurrence of the sub-expression Y or N in the value. This will require a lot of plpgsql code to be able to do that but with new extended version of regexp_replace() you can now write it as following :

SELECT regexp_replace('123|Y|PAN|N|45|Y|Y|EI', '(Y|N)\|', '', 1, 4);
   regexp_replace
---------------------
 123|Y|PAN|N|45|Y|EI
(1 row)

This is not a common use for regular expressions but when it happens, it saves time with such a feature in PostgreSQL 15. And obviously, it also helps if you want to migrate from other RDBMS that has already got these regexp functions implemented. When you will be migrating to PostgreSQL 15 in the future, you should make sure that you verify whether they have the same behaviour similar to the existing application, as it may not be at all times. Usually, you can easily fix any such behavioural changes by using the right flags (regexp modifiers). See the PostgreSQL devel documentation and especially the last section about the differences between the POSIX-based regular-expression feature and XQuery regular expressions.

I want to thank Tom Lane for the work on the deeper integration of this code to PostgreSQL core and all the work to improve regular expressions in PostgreSQL.

Contact MigOps for Migrations to PostgreSQL

We get a lot of ideas from the migrations we do from Oracle to PostgreSQL or any other database like SQL Server or DB2 or Sybase to PostgreSQL. We see whether these missing functionalities can be contributed to an Open Source PostgreSQL extension or to PostgreSQL. If you are looking to migrate to PostgreSQL and require any support, please contact us at : sales@migops.com or fill the following form.

Our Recent Articles

The post PostgreSQL 15 will include some more regexp functions appeared first on MigOps.


Shaun M. Thomas: High Availability, PostgreSQL, and More: The Return of PG Phriday

$
0
0
PG Phriday is back! EDB High Availability Architect Shaun Thomas revives his once infamous blog series to once again tackle technical topics at the tip of the Postgres world, this time with a special focus on High Availability. [Continue reading...]

Andreas 'ads' Scherbaum: Louise Grandjonc

$
0
0
PostgreSQL Person of the Week Interview with Louise Grandjonc: I’m Louise, I come from France and recently moved to Vancouver (Canada, not Washington, I was not aware there was another Vancouver before announcing I was moving, and several US people asked) to work at Crunchy Data as a senior software engineer.

Franck Pachot: ORDER BY is mandatory in SQL to get a sorted result

$
0
0

In IT, like in math, a negative test can prove that an assertion is wrong. But a positive test doesn't prove that the assertion is right. It is worse in IT because the algorithm may show an apparently correct result with a probablilty that is higher than just being lucky:

postgres=# create table demo (n int primary key);
CREATE TABLE

postgres=# insert into demo  
           select n from generate_series(1,1e6) n;
INSERT 0 1000000

postgres=# select n from demo limit 10;

 n
----
  1
  2
  3
  4
  5
  6
  7
  8
  9
 10
(10 rows)

With this example, you may think that a select returns the rows ordered. This is wrong. The SQL language is declarative. Without an ORDER BY, the result is random. The apparently sorted result here is just a side effect of inserting into heap tables by appending at the end of the file. And reading the file from beginning to end with one thread. The rows are displayed as they are fetched.

When I insert the rows in another order:

postgres=# drop table if exists demo;
DROP TABLE
postgres=# create table demo (n int primary key);
CREATE TABLE
postgres=# insert into demo  select 1e6-n from generate_series(1,1e6) n;
INSERT 0 1000000
postgres=# select n from demo limit 10;
   n
--------
 999999
 999998
 999997
 999996
 999995
 999994
 999993
 999992
 999991
 999990
(10 rows)

they come as they were stored. This is typical of a serial SeqScan:

postgres=# explain select n from demo limit 10;
                             QUERY PLAN
-------------------------------------------------------------
 Limit  (cost=0.00..0.14 rows=10 width=4)
   ->  Seq Scan on demo  (cost=0.00..14425.00 rows=1000000 width=4)
(2 rows)

You cannot rely on any of this behavior. With another execution plan, this order may change:

postgres=# set enable_seqscan=false;
SET
postgres=# select n from demo limit 10;
 n
--------
 0
 1
 2
 3
 4
 5
 6
 7
 8
 9
(10 rows)

postgres=# explain select n from demo limit 10;

                                        QUERY PLAN
-------------------------------------------------------------
 Limit  (cost=0.42..0.77 rows=10 width=4)
   ->  Index Only Scan using demo_pkey on demo  (cost=0.42..34712.43 rows=1000000 width=4)
(2 rows)

Many things can change the behavior. Here an index scan instead of a full table scan. Parallel query will also change the way they are read by SeqScan. And updates can also move them physically:

postgres=# set enable_seqscan=true;
SET
postgres=# alter table demo add column x char;
ALTER TABLE
postgres=# update demo set x=1 where mod(n,3)=0;
UPDATE 333334
postgres=# select n from demo limit 10;
   n
-------------
 999998
 999997
 999995
 999994
 999992
 999991
 999989
 999988
 999986
 999985
(10 rows)

The only way to get a reliable sorted result is with an ORDER BY:

postgres=# select n from demo order by n limit 10;
 n
--------
 0
 1
 2
 3
 4
 5
 6
 7
 8
 9
(10 rows)

Don't think an ORDER BY will have to sort the rows, the query planner may opt for a physical structure that returns the them in order:

postgres=# explain select n from demo order by n limit 10;
                                        QUERY PLAN
------------------------------------------------------------------------------------------------
 Limit  (cost=0.42..0.77 rows=10 width=4)
   ->  Index Only Scan using demo_pkey on demo  (cost=0.42..34716.43 rows=1000000 width=4)
(2 rows)

In SQL you declare the order you want, and the query planner knows which access methods retrieves them in order. The optimizer knows but you don't know. Except of course if you have read, and understood, the source code for the exact version you run.

YugabyteDB

In a distributed SQL database, there are good chances that the default order does not match anything you expect:

yugabyte=# create table demo (n int primary key);
CREATE TABLE

yugabyte=# insert into demo  select 1e6-n from generate_series(1,1e6) n;
INSERT 0 1000000

yugabyte=# select n from demo limit 10;

   n
-------------
 110359
 192735
 219128
 237047
 310517
 593962
 627995
 651891
 669921
 790562
(10 rows)

This looks random. But of course, there's a logic. The default sharding method is a hash function on the first column of the primary key. We can query this hashing function ourselves with yb_hash_code()

yugabyte=# select min(h),max(h),avg(h) from (
            select yb_hash_code( generate_series(1,1e6) ) h 
           ) v;

 min |  max  |        avg
----------+-------+--------------------
   0 | 65535 | 32774.509179000000
(1 row)

This function can return one of the 65536 values from 0 to 65535. This is what is used to distribute rows into tablets in the distributed storage (DocDB).

Without an ORDER BY, the rows are returned ordered on this hash code first:

yugabyte=# select yb_hash_code(n), n from demo limit 10;

 yb_hash_code |   n
-------------------+--------
            0 | 110359
            0 | 192735
            0 | 219128
            0 | 237047
            0 | 310517
            0 | 593962
            0 | 627995
            0 | 651891
            0 | 669921
            0 | 790562
(10 rows)

Look, If I query all rows with this speific hash code, they come back in order.

yugabyte=# select n from demo where yb_hash_code(n)=0;

   n
-------------
 110359
 192735
 219128
 237047
 310517
 593962
 627995
 651891
 669921
 790562
 792363
 819768
 891493
 984191
(14 rows)

When understanding the way the rows are stored physically, and retrieved with a SeqScan, the order is random but not magic:

yugabyte=# select n, yb_hash_code(n) from demo limit 50;

   n    | yb_hash_code
-------------+--------------
 110359 |            0
 192735 |            0
 219128 |            0
 237047 |            0
 310517 |            0
 593962 |            0
 627995 |            0
 651891 |            0
 669921 |            0
 790562 |            0
 792363 |            0
 819768 |            0
 891493 |            0
 984191 |            0
  17012 |            1
  24685 |            1
 153595 |            1
 186378 |            1
 219742 |            1
 258869 |            1
 271029 |            1
 547922 |            1
 565568 |            1
 763430 |            1
 766123 |            1
 772002 |            1
 781840 |            1
 840822 |            1
 844655 |            1
 953917 |            1
 162485 |            2
 168413 |            2
 271551 |            2
 285516 |            2
 407063 |            2
 420509 |            2
 440160 |            2
 572540 |            2
 585722 |            2
 589471 |            2
 628271 |            2
 719191 |            2
 837125 |            2
 866379 |            2
 951013 |            2
 976519 |            2
 994652 |            2
    854 |            3
  57757 |            3
  70079 |            3
(50 rows)

Internally, the YugabyteDB table rows are stored ordered on the document key, which is the primary key prefixed by the hash code. This brings the fast access to a key point or range: from the hash code, it determines the right tablet. And then it finds the row in the SSTable (Sorted Sequence Table) structure.

If I decide to shard on a range, even a SeqScan would return in order:

yugabyte=# drop table demo;
DROP TABLE

yugabyte=# create table demo (n int, primary key(n asc))
           split at values ( (333333),(666666) );
CREATE TABLE

yugabyte=# insert into demo  select 1e6-n from generate_series(1,1e6) n;
INSERT 0 1000000

yugabyte=# select n from demo limit 10;
 n
--------
 0
 1
 2
 3
 4
 5
 6
 7
 8
 9
(10 rows)

yugabyte=# explain analyze select n from demo limit 10;
                                                QUERY PLAN
---------------------------------------------------------------------------------------------------------------
 Limit  (cost=0.00..1.00 rows=10 width=4) (actual time=0.788..0.796 rows=10 loops=1)
   ->  Seq Scan on demo  (cost=0.00..100.00 rows=1000 width=4) (actual time=0.787..0.791 rows=10 loops=1)
 Planning Time: 0.047 ms
 Execution Time: 0.855 ms
(4 rows)

The Seq Scan on is then similar to the Index Scan on the primary key:

yugabyte=# explain analyze select n from demo order by n limit 10;
                                                         QUERY PLAN
---------------------------------------------------------------------------------------------------------------------------------
 Limit  (cost=0.00..1.14 rows=10 width=4) (actual time=0.809..0.816 rows=10 loops=1)
   ->  Index Scan using demo_pkey on demo  (cost=0.00..114.00 rows=1000 width=4) (actual time=0.808..0.813 rows=10 loops=1)
 Planning Time: 0.066 ms
 Execution Time: 0.843 ms
(4 rows)

This is because the table is actually stored in the primary key structure (Similar to Oracle Index Organized Table, or SQL Server Clustered Index, or MySQL InnoDB tables...)

I mentioned that the hash code has 65536:

yugabyte=# drop table demo;
DROP TABLE
yugabyte=# create table demo (n int primary key)
           split into 16 tablets;
CREATE TABLE
yugabyte=# insert into demo
           select n from generate_series(1,1e6) n;
INSERT 0 1000000
yugabyte=# select count(distinct yb_hash_code(n)) from demo;
 count
------------
 65536
(1 row)

But of course the number of tablets is lower. Just a few per nodes to allow adding nodes. When I want to know the number of tablets

If by curiosity you want to know how many tablets, I run an aggregate function that is pushed-down to each tablet so that the number of rows in the execution plan is the number of aggregations:

yugabyte=# explain analyze select count(*) from demo;

yugabyte=# explain analyze select count(*) from demo;
                                                  QUERY PLAN
-------------------------------------------------------------------------------------------------------------------
 Aggregate  (cost=102.50..102.51 rows=1 width=8) (actual time=984.031..984.031 rows=1 loops=1)
   ->  Seq Scan on demo  (cost=0.00..100.00 rows=1000 width=0) (actual time=357.419..984.010 rows=16 loops=1)
 Planning Time: 0.055 ms
 Execution Time: 984.145 ms
(4 rows)

The rows=16 is from the 16 count(*) results coming from each tablets. I have 16 tablets here, with 65536/16=4096 hash codes per tablet.

It is interesting to understand how the rows are stored and fetched, because you can think about performance. But when it comes to run application queries, don't forget that SQL is a declarative language. If you want a sorted result, declare it with ORDER BY. And the query planner will figure out what to do.

Álvaro Hernández: Easily Running Babelfish for PostgreSQL on Kubernetes

$
0
0

Easily Running Babelfish for PostgreSQL on Kubernetes

TL;DR

Babelfish for PostgreSQL (“Babelfish” in short) is an open source project created by Amazon AWS that adds SQL Server compatibility on top of Postgres. It was made public a couple of weeks ago both as a managed service and as an open source project. Using the latter involves as of today compiling it from source, which requires some effort and expertise. To contribute a better user’s experience, the upcoming StackGres 1.1.0 release has added Babelfish, making it trivially easy to run Babelfish on Kubernetes.

If, for any reason, you don’t have a Kubernetes cluster handy; and/or you are not familiar with Kubernetes, please jump first to the Appendix in the last section, where I show how to get up & running a lightweight Kubernetes cluster in 1 minute.

Babelfish for PostgreSQL

Around one year ago, Amazon surprised us all by announcing Babelfish for PostgreSQL, a project that would bring a SQL Server compatibility layer on top of Postgres. Babelfish would become both an AWS managed service (on Aurora); as well as an open source project! I then blogged about it, knowing that this was a disruption point for Postgres. Babelfish enables Postgres to reach out to many other use cases, users and Communities: the SQL Server ecosystem.

Adding yet another capability to Postgres reflects on the thoughts shared by Stephen O’Grady on a recent post, A Return to the General Purpose Database. Postgres is not only a feature-full relational database; but with its extensions, it’s also a time-series database; a sharded database; a graph database; and now, also a SQL Server-compatible database. Postgres is, and will be, the unifying database for almost every imaginable database workload.

At StackGres we were almost literally eating our finger’s nails, waiting for Babelfish to be finally published as open source. It finally happened a couple of weeks ago. Since then, our team has been working tirelessly to give you an easy way to run Babelfish on Kubernetes, by integrating Babelfish in StackGres. Kudos to the whole team for such an amazing job!

Not only are we making Babelfish available on Kubernetes; but also giving to the Community the first (as far as we know) mechanism to run the open source Babelfish version without having to go through the (somehow involved) process of compiling it from the source code. With StackGres, you can go from zero to Babelfish in one command to install StackGres; and a 15-lines YAML to create a Babelfish-enabled cluster. It can’t hardly get easier than this.

Install StackGres 1.1.0-beta1 with Babelfish support

Installation is just one command. The recommended installation method is with Helm:

$ helm install --namespace stackgres --create-namespace stackgres \
  https://stackgres.io/downloads/stackgres-k8s/stackgres/1.1.0-beta1/helm/stackgres-operator.tgz

In some seconds / a minute you should have StackGres installed. If you see the StackGres ascii-art logo, you are ready to go!

Create a Babelfish cluster

Creating a Babelfish cluster is not so much different from creating a simple Postgres cluster. The few differences will be highlighted. Follow the instructions on either of the next two sections ("Using kubectl" or “Using the Web Console"), depending on your preferences. You can use either method interchangeably.

First, create a namespace:

$ kubectl create namespace notmssql

Using kubectl

Create the following 15-line file bbf.yaml with the following content:

kind: SGCluster
apiVersion: stackgres.io/v1
metadata:
  namespace: notmssql
  name: bbf
spec:
  instances: 1
  postgres:
    version: 'latest'flavor: babelfishpods:
    persistentVolume:
      size: '5Gi'nonProductionOptions:
    enabledFeatureGates: [ "babelfish-flavor" ]

The main differences between creating a Babelfish cluster and a regular (vanilla Postgres) cluster are:

  • The .spec.postgres.flavor field must be set to babelfish. If unset, it is assumed the default “vanilla” Postgres flavor. Also note that the version: latest field automatically resolves to different versions, depending on the flavor (14.0 for the default Postgres flavor and 13.4 for Babelfish).

  • Babelfish is in preview mode in StackGres. It is not considered production ready. As such, you need to explicitly enable a feature gate named babelfish-flavor or cluster creation would be rejected by StackGres. This is what the two last lines do.

Finally apply it with:

$ kubectl apply -f bbf.yaml

In around a minute, you should get your Babelfish cluster running on StackGres! It wasn’t hard, was it? You can check that the cluster is up and running:

$ kubectl -n notmssql get pods   	 
NAME    READY   STATUS      RESTARTS      AGE
bbf-0   6/6     Running     0             11m

Using the Web Console

StackGres comes bundled with a fully-featured Web Console, that it’s installed by default. For simplicity, let’s use the port-forwarding mechanism of kubectl to expose it on a port local to your computer:

$ WEBC=`kubectl --namespace stackgres get pods -l "app=stackgres-restapi" -o jsonpath="{.items[0].metadata.name}"`
$ kubectl --namespace stackgres port-forward "$WEBC" 8443:9443

Open in your web browser the address https://localhost:8443/. You will see a warning (expected, the certificate is self-signed, you may also bring your own with custom Helm parameters). The default username is admin. The password is generated randomly and can be queried with the following command:

$ kubectl -n stackgres get secret stackgres-restapi --template '{{ printf "%s\n" (.data.clearPassword | base64decode) }}'

Select the notmssql namespace in the dropdown. And proceed to create a new SGCluster. Select the Babelfish flavor (you will see that the feature gate “Babelfish Flavor” becomes enabled). It should look like the following screenshot:

Create a Babelfish cluster from the Web Console

Connecting to your Babelfish cluster via the TDS protocol

Babelfish speaks the TDS protocol, like SQL Server. By default it listens in the same TCP port, 1433, and this is also what StackGres exposes.

To easily get connected using the TDS protocol, this StackGres release also includes with the postgres-util sidecar of every pod the command line utility usql, a database client that supports many databases, including SQL Server. By default, StackGres installation creates a database named babelfish, owned by a superuser named babelfish, that is initialized to be connected via the TDS protocol, with all the required Babelfish extensions already loaded. The password is generated randomly and can be obtained from the secret named after the cluster name:

$ kubectl -n notmssql get secret bbf --template '{{ printf "%s" (index .data "babelfish-password" | base64decode) }}'

Knowing the password, we can trivially connect to Babelfish with usql, using the SQL Server protocol, and run some example T-SQL queries:

$ kubectl -n notmssql exec -it bbf-0 -c postgres-util -- usql --password ms://babelfish@localhost
Enter password:                                                                  
Connected with driver sqlserver (Microsoft SQL Server 12.0.2000.8, , Standard Edition)                                                                                                                          
Type "help"for help.                                                                        
                                                                                                        
ms:babelfish@localhost=> select @@version;                                                              
                               version                                                                                                                                                                          
----------------------------------------------------------------------                                  
 Babelfish for PostgreSQL with SQL Server Compatibility - 12.0.2000.8+                                                                                                                                          
 Nov  32021 09:55:42                                                +             
 Copyright (c) Amazon Web Services                                   +                       
 PostgreSQL 13.4 for Babelfish OnGres Inc. on x86_64-pc-linux-gnu                                       
(1 row)                                                             
                                                                                                        
ms:babelfish@localhost=> create schema sch1;         
CREATE SCHEMA                                                
ms:babelfish@localhost=> create table [sch1].test (                                      
ms:babelfish@localhost(> pk int primary key identity(1,1),         
ms:babelfish@localhost(> text varchar(50),                                                                                                                                                                      
ms:babelfish@localhost(> t datetime);                                                                                                                                                                           
CREATE TABLE                                                                                                                                                                                                    
ms:babelfish@localhost=> insert into  [sch1].test (text, t) values ('hi', getdate());                                                                                                                           
INSERT 1                                                                                              
ms:babelfish@localhost=> select * from [sch1].test;              
 pk | text |            t                                                             
----+------+-------------------------                                                
  1 | hi   | 2021-11-14T23:26:05.45Z                                                                    
(1 row)

Above are shown commands using the T-SQL syntax, and a connection over the TDS protocol, with specific SQL Server data types and functions. But there’s no SQL Server, only Postgres! It would be interesting to see how this is seen by Postgres? Let’s give it a try!

$ kubectl -n notmssql exec -it bbf-0 -c postgres-util -- psql babelfish      
psql (13.4 OnGres Inc.)                                                             
Type "help"for help.                                                                                                                                                                                           
                                                                                                        
babelfish=# \d master_sch1.test
                                   Table "master_sch1.test"
 Column |       Type        |       Collation       | Nullable |           Default            
--------+-------------------+-----------------------+----------+------------------------------
 pk     | integer           |                       | not null | generated always as identity
 text   | sys."varchar"(50) | bbf_unicode_cp1_ci_as |          | 
 t      | sys.datetime      |                       |          | 
Indexes:
    "test_pkey" PRIMARY KEY, btree (pk)

babelfish=# table master_sch1.test;
 pk | text |            t            
----+------+-------------------------
  1 | hi   | 2021-11-14 23:26:05.449
(1 row)

That was interesting! You can see the obvious differences between the different syntax and data types.

Finally, let’s try to access Babelfish from a GUI tool. Firstly, let’s use port-forward to expose our pod’s port 1433 on our own laptop:

$ kubectl --namespace notmssql port-forward bbf-0 1433:1433

Now you can use GUI tools to connect as if you had SQL Server on your laptop. Some may not work yet, as Babelfish progresses. Below is a screenshot of how I connected with DBeaver:

Connecting to Babelfish with DBeaver, using the SQL Server protocol

Just please note to use the default’s master value for the Database/Schema. Querying the metadata table gave some errors, but general operation works well, and data is perfectly shown. Enjoy running T-SQL on your Babelfish for PostgreSQL.

Conclusion

Please be aware that this is a beta version of the upcoming 1.1.0 release, and as such it is not as polished as a GA release. Even on 1.1.0GA, Babelfish will not be declared “production ready”. Use it at your own risk.

However, it is quite interesting to start exploring Babelfish, given that StackGres makes it so simple to use. No need to go over the somehow involved compilation process that the current open source Babelfish release requires. Just a few commands, and you get a fully working Babelfish version on Kubernetes.

We’re eager to get feedback and ideas from you all. Please join our Slack and/or Discord channels and let you know what you think about Babelfish, StackGres, and chat about any other topic related to Postgres on Kubernetes, if you want.

Appendix: If you don’t have Kubernetes, get it in 1 minute

Not totally familiar with Kubernetes yet still want to easily try Babelfish? Keep reading, you just need one additional minute.

Run on your laptop:

$ curl -sfL https://get.k3s.io | sh -

This will get you running with K3s, a lightweight, certified Kubernetes distribution by SUSE Rancher. K3s will get started as a service on your system (managed by systemd; you can later stop with sudo systemctl stop k3s and/or uninstall with /usr/local/bin/k3s-uninstall.sh). To get access to kubectl, you can get it via the k3s binary:

$ sudo k3s kubectl
$ alias kubectl="sudo k3s kubectl"# optional

To check that the k3s cluster is running, you can run:

$ kubectl cluster-info
Kubernetes control plane is running at https://127.0.0.1:6443
CoreDNS is running at https://127.0.0.1:6443/api/v1/namespaces/kube-system/services/kube-dns:dns/proxy
Metrics-server is running at https://127.0.0.1:6443/api/v1/namespaces/kube-system/services/https:metrics-server:/proxy

To further debug and diagnose cluster problems, use 'kubectl cluster-info dump'.

You are ready to go!

Pavlo Golub: PostgreSQL on WSL2 for Windows: Install and setup

$
0
0

This post explains how to install PostgreSQL on WSL2 for Windows, apply the necessary changes to PostgreSQL settings, and access the database from the Windows host. Even though this knowledge can be found in different bits and pieces spread out all over the internet, I want to compile a short and straightforward how-to article. I want you to be able to complete all the steps from scratch, without having to skip all over the place.

Why do I need PostgreSQL on WSL2?

Even though there is a strong feeling that a true programmer uses Linux in their work, this statement is not really close to the truth. At least, according to this Stack Overflow survey 2021:

What is the primary operating system in which you work?

There are a ton of reasons why a developer might want to use WSL2 with PostgreSQL onboard, but let’s name a few:

  • psql is the standard tool for learning and working with PostgreSQL. However, there are some limiting issues under Windows, e.g., the lack of tab completion, issues with encoding, etc. Running psql under WSL2 will provide you with a smoother experience.
  • It’s a good idea to test and debug your application in a remote environment rather than on a local host. That way, you can immediately find issues with client authentication, or with connection settings. Since WSL2 is a standalone virtual machine under the hood, using it might be the easiest way to achieve this.
  • WSL2 will provide the environment for advanced developers to build and test different PostgreSQL extensions not available in binary form or created exclusively for Linux, e.g., pg_squeeze, pg_show_plans, pg_crash, pg_partman, etc.

Install WSL2

To install WSL2 from PowerShell or the Windows Command Prompt, just run:

PS> wsl --install

From the manual:

  • This command will enable the required optional components, download the latest Linux kernel, set WSL2 as your default, and install a Ubuntu distribution for you by default.
  • The first time you launch a newly installed Linux distribution, a console window will open and you’ll be asked to wait for files to de-compress and be stored on your machine. All future launches should take less than a second.

Supposing you prefer to change the distribution installed, you have the option to choose among those available. To list the known distros, run:

PS> wsl --list --online
The following is a list of valid distributions that can be installed.
Install using 'wsl --install -d <Distro>'.

NAME            FRIENDLY NAME
Ubuntu          Ubuntu
Debian          Debian GNU/Linux
kali-linux      Kali Linux Rolling
openSUSE-42     openSUSE Leap 42
SLES-12         SUSE Linux Enterprise Server v12
Ubuntu-16.04    Ubuntu 16.04 LTS
Ubuntu-18.04    Ubuntu 18.04 LTS
Ubuntu-20.04    Ubuntu 20.04 LTS

After that, you can install the chosen Linux distribution on WSL2 by running the command:

PS> wsl --install -d Debian

Here in this post, I will use the Ubuntu distribution for demonstration purposes.

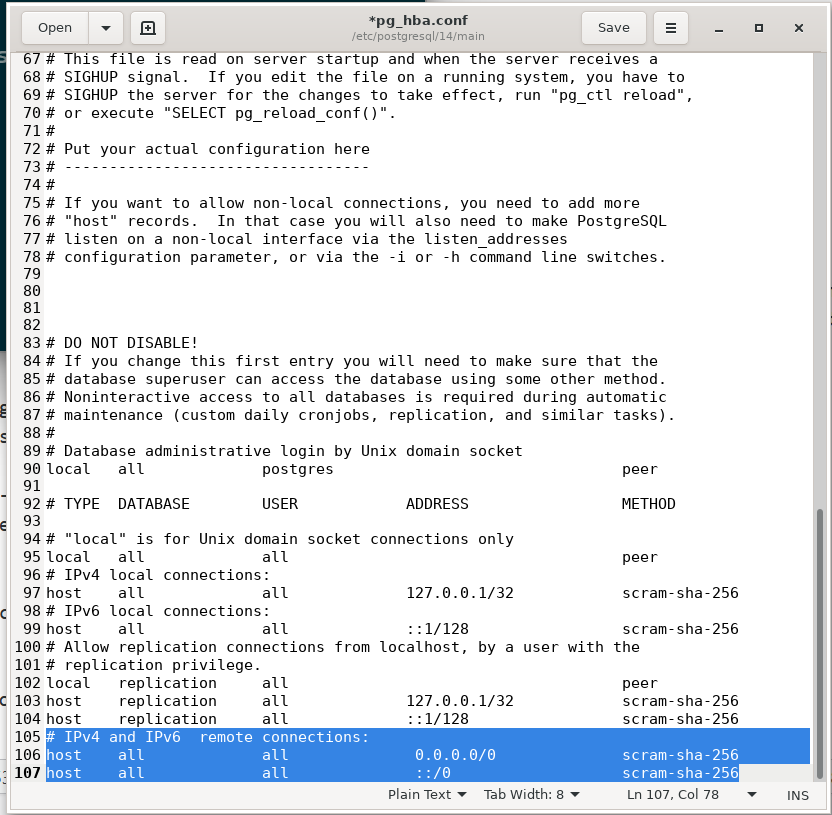
⚠ All further commands are supposed to be executed in the Ubuntu WSL2 session.

I strongly suggest using Windows Terminal to work with console sessions.

Install PostgreSQL on WSL2 Ubuntu

Please follow the instructions on the official site:

$ sudo sh -c 'echo "deb http://apt.postgresql.org/pub/repos/apt $(lsb_release -cs)-pgdg main" > /etc/apt/sources.list.d/pgdg.list'

$ wget --quiet -O - https://www.postgresql.org/media/keys/ACCC4CF8.asc | sudo apt-key add -

$ sudo apt-get update

$ sudo apt-get -y install postgresql postgresql-contrib

$ psql --version
psql (PostgreSQL) 14.0 (Ubuntu 14.0-1.pgdg20.04+1)

$ sudo service postgresql status
14/main (port 5432): down

$ sudo service postgresql start
 * Starting PostgreSQL 14 database server

Please take note: we are not usingsystemctl because WSL2 doesn’t use systemd to operate:

$ sudo systemctl status postgresql
System has not been booted with systemd as init system (PID 1). Can't operate.
Failed to connect to bus: Host is down

Set up PostgreSQL on WSL2

Now we need to set up PostgreSQL so it will:

  • accept connections from the Windows host;
  • have custom-created users;
  • allow authentication from remote hosts.

By the way, let me recommend my friend Lætitia Avrot’s blog to you, where all these topics are covered.

How do I accept connections from the Windows host for PostgreSQL on WSL2?

🔔I’m aware that the newest WSL2 version allows localhost forwarding, but I think this topic is essential to know, especially in constructing a development environment!

By default, every PostgreSQL installation listens on 127.0.0.1 only. That means you cannot access the database instance from a remote host, including the Windows host. This is not a bug. This is a security feature.

To change this setting, we need to:

  1. edit postgresql.conf;
  2. uncomment (sic!)listen_address line;
  3. change it to listen_address = '*' for every available IP address or comma-separated list of addresses;
  4. restart the PostgreSQL instance, so the new settings take effect.

Depending on your distro, the location of the postgresql.conf file may differ. The easiest way to know where it is is to ask the server itself. However, there is one catch here.

Right now, there is only one user available in our fresh PostgreSQL installation: postgres. And there is only one way to connect to the instance: peer authentication.

That means the operating system (Ubuntu on WSL2) should provide a user name from the kernel and use it as the allowed database user name:

sudo -u postgres psql -c 'SHOW config_file'
               config_file
-----------------------------------------
 /etc/postgresql/14/main/postgresql.conf
(1 row)

🔔If you are struggling to understand what this command does, I suggest you visit the fantastic explainshell.com site!

Now let’s do something fun! The latest WSL2 is so cool that it allows you to run GUI Linux applications! So instead of using a TUI editor like nano or vim, we will use Gedit!

$ sudo apt install gedit -y

$ sudo gedit /etc/postgresql/14/main/postgresql.conf

$ sudo service postgresql restart

postgresql.conf in gedit (Ubuntu-20.04 on WSL2)

How do I add users to a PostgreSQL cluster?

As I said, by default, there is only one user available: postgres . I strongly recommend creating a separate user.

Here we will use the same trick to connect to PostgreSQL with psql, and execute the CREATE USER command:

$ sudo -u postgres psql
psql (14.0 (Ubuntu 14.0-1.pgdg20.04+1))
Type "help" for help.

postgres=# CREATE USER dev PASSWORD 'strongone' CREATEDB;
CREATE ROLE
postgres=# \q

Now we can specify our newly created user dev and connect to PostgreSQL using password authentication. Please note that I explicitly used the -h 127.0.0.1 parameter to force password authentication instead of peer authentication.

$ psql -U dev -h 127.0.0.1 -d postgres
Password for user dev:
psql (14.0 (Ubuntu 14.0-1.pgdg20.04+1))
SSL connection (protocol: TLSv1.3, cipher: TLS_AES_256_GCM_SHA384, bits: 256, compression: off)
Type "help" for help.

postgres=>\q

How can I allow authentication from remote hosts for PostgreSQL on WSL2?

The easiest way would be to add additional lines to the pg_hba.conf file:

...
host    all             all              0.0.0.0/0                       scram-sha-256
host    all             all              ::/0                            scram-sha-256

This change will apply scram-sha-256password authentication for all IPv4 and IPv6 connections.

$ sudo -u postgres psql -c 'SHOW hba_file'
              hba_file
-------------------------------------
 /etc/postgresql/14/main/pg_hba.conf
(1 row)

$ sudo gedit /etc/postgresql/14/main/pg_hba.conf

$ sudo service postgresql restart

pg_hba.conf in gedit (Ubuntu-20.04 on WSL2)

How do I connect to PostgreSQL on WSL2 from a Windows host?

With the latest WSL2 version, you can access PostgreSQL from a Windows app (like psql or pgAdmin) using localhost (just like you usually would):

PS> psql -U dev -d postgres
Password for user dev:
psql (13.0, server 14.0 (Ubuntu 14.0-1.pgdg20.04+1))
WARNING: psql major version 13, server major version 14.
         Some psql features might not work.
WARNING: Console code page (65001) differs from Windows code page (1251)
         8-bit characters might not work correctly. See psql reference
         page "Notes for Windows users" for details.
SSL connection (protocol: TLSv1.3, cipher: TLS_AES_256_GCM_SHA384, bits: 256, compression: off)
Type "help" for help.

postgres=>\q

⚠ But if you have conflicts with, for example, a local (Windows) PostgreSQL installation, you might want to use the specific WSL2 IP address. The same applies if you are running an older version of Windows (Build 18945 or less).

As I mentioned earlier, the WSL2 system is a standalone virtual machine with its own IP address. So first, we need to know the IP address to connect. There are several ways to do so. Choose whatever you prefer.

You can run such a command in the WSL2 session:

$ ip addr show eth0
6: eth0: <BROADCAST,MULTICAST,UP,LOWER_UP> mtu 1500 qdisc mq state UP group default qlen 1000
    link/ether 00:15:5d:19:85:ca brd ff:ff:ff:ff:ff:ff
    inet 192.168.176.181/20 brd 192.168.191.255 scope global eth0
       valid_lft forever preferred_lft forever
    inet6 fe80::215:5dff:fe19:85ca/64 scope link
       valid_lft forever preferred_lft forever

Or even shorter– if you don’t need all those details:

$ hostname -I
192.168.176.181

Or, you can run one of these commands from PowerShell, or from the Command Prompt session in the Windows host:

PS> bash -c "hostname -I"
192.168.176.181

PS> wsl -- hostname -I
192.168.176.181

Now that we know the IP address, we can connect to PostgreSQL on WSL2 with psql:

PS> psql -U dev -d postgres -h 192.168.176.181
Password for user dev:
psql (13.0, server 14.0 (Ubuntu 14.0-1.pgdg20.04+1))
WARNING: psql major version 13, server major version 14.
         Some psql features might not work.
WARNING: Console code page (65001) differs from Windows code page (1251)
         8-bit characters might not work correctly. See psql reference
         page "Notes for Windows users" for details.
SSL connection (protocol: TLSv1.3, cipher: TLS_AES_256_GCM_SHA384, bits: 256, compression: off)
Type "help" for help.

postgres=> \q

Or connect with any GUI you prefer, for example, with HeidiSQL:
HeidiSQL - Session Manager

The only drawback is that the WSL2 machine IP address cannot be made static! That means you will need to check the IP address after each restart or set up some startup script to update the system environment variable of some file content with the current IP. Since there is no universal solution, I will leave that as homework for the reader. 😉

Conclusion

In this post, we learned:

  • how to install WSL2;
  • the way to install PostgreSQL on the default WSL2 distro Ubuntu;
  • how to set up PostgreSQL to listen on all IP addresses;
  • how to set up PostgreSQL to authenticate users from all IP addresses;
  • some tricks, software, and services.

Let me know if this topic is interesting for you and the issues we should highlight in the follow-up articles.

Here’s where you can find more Windows-specific posts you may find helpful.

In conclusion, I wish you all the best! ♥
Please, stay safe – so we can meet in person at one of the conferences, meetups, or training sessions!

The post PostgreSQL on WSL2 for Windows: Install and setup appeared first on CYBERTEC.

Hubert 'depesz' Lubaczewski: Waiting for PostgreSQL 15 – Allow publishing the tables of schema.

Christoph Berg: PostgreSQL and Undelete

$
0
0

pg_dirtyread

Earlier this week, I updated pg_dirtyread to work with PostgreSQL 14. pg_dirtyread is a PostgreSQL extension that allows reading "dead" rows from tables, i.e. rows that have already been deleted, or updated. Of course that works only if the table has not been cleaned-up yet by a VACUUM command or autovacuum, which is PostgreSQL's garbage collection machinery.

Here's an example of pg_dirtyread in action:

# create table foo (id int, t text);
CREATE TABLE
# insert into foo values (1, 'Doc1');
INSERT 0 1
# insert into foo values (2, 'Doc2');
INSERT 0 1
# insert into foo values (3, 'Doc3');
INSERT 0 1

# select * from foo;
 id │  t
────┼──────
  1 │ Doc1
  2 │ Doc2
  3 │ Doc3
(3 rows)

# delete from foo where id < 3;
DELETE 2

# select * from foo;
 id │  t
────┼──────
  3 │ Doc3
(1 row)

Oops! The first two documents have disappeared.

Now let's use pg_dirtyread to look at the table:

# create extension pg_dirtyread;
CREATE EXTENSION

# select * from pg_dirtyread('foo') t(id int, t text);
 id │  t
────┼──────
  1 │ Doc1
  2 │ Doc2
  3 │ Doc3

All three documents are still there, just now all of them are visible.

pg_dirtyread can also show PostgreSQL's system colums with the row location and visibility information. For the first two documents, xmax is set, which means the row has been deleted:

# select * from pg_dirtyread('foo') t(ctid tid, xmin xid, xmax xid, id int, t text);
 ctid  │ xmin │ xmax │ id │  t
───────┼──────┼──────┼────┼──────
 (0,1) │ 1577 │ 1580 │  1 │ Doc1
 (0,2) │ 1578 │ 1580 │  2 │ Doc2
 (0,3) │ 1579 │    0 │  3 │ Doc3
(3 rows)

I always had plans to extend pg_dirtyread to include some "undelete" command to make deleted rows reappear, but never got around to trying that. But rows can already be restored by using the output of pg_dirtyread itself:

# insert into foo select * from pg_dirtyread('foo') t(id int, t text) where id = 1;

This is not a true "undelete", though - it just inserts new rows from the data read from the table.

pg_surgery

Enter pg_surgery, which is a new PostgreSQL extension supplied with PostgreSQL 14. It contains two functions to "perform surgery on a damaged relation". As a side-effect, they can also make delete tuples reappear.

As I discovered now, one of the functions, heap_force_freeze(), works nicely with pg_dirtyread. It takes a list of ctids (row locations) that it marks "frozen", but at the same time as "not deleted".

Let's apply it to our test table, using the ctids that pg_dirtyread can read:

# create extension pg_surgery;
CREATE EXTENSION

# select heap_force_freeze('foo', array_agg(ctid))
    from pg_dirtyread('foo') t(ctid tid, xmin xid, xmax xid, id int, t text) where id = 1;
 heap_force_freeze
───────────────────

(1 row)

Et voilà, our deleted document is back:

# select * from foo;
 id │  t
────┼──────
  1 │ Doc1
  3 │ Doc3
(2 rows)

# select * from pg_dirtyread('foo') t(ctid tid, xmin xid, xmax xid, id int, t text);
 ctid  │ xmin │ xmax │ id │  t
───────┼──────┼──────┼────┼──────
 (0,1) │    2 │    0 │  1 │ Doc1
 (0,2) │ 1578 │ 1580 │  2 │ Doc2
 (0,3) │ 1579 │    0 │  3 │ Doc3
(3 rows)

Disclaimer

Most importantly, none of the above methods will work if the data you just deleted has already been purged by VACUUM or autovacuum. These actively zero out reclaimed space. Restore from backup to get your data back.

Since both pg_dirtyread and pg_surgery operate outside the normal PostgreSQL MVCC machinery, it's easy to create corrupt data using them. This includes duplicated rows, duplicated primary key values, indexes being out of sync with tables, broken foreign key constraints, and others. You have been warned.

pg_dirtyread does not work (yet) if the deleted rows contain any toasted values. Possible other approaches include using pageinspect and pg_filedump to retrieve the ctids of deleted rows.

Please make sure you have working backups and don't need any of the above.


Bruce Momjian: Enterprise Postgres Growth in Japan

$
0
0

I presented a new slide deck, Enterprise Postgres Growth in Japan, at last week's Japan PostgreSQL User Group (JPUG) conference. I have been closely involved with the Japanese Postgres community for 20 years, and distilling lessons from my involvement was challenging. However, I was very happy with the result, and I think the audience benefited. I broke down the time into three periods, and concluded that the Japanese are now heavily involved in Postgres server development, and the community greatly relies on them.

Charly Batista: Should I Create an Index on Foreign Keys in PostgreSQL?

$
0
0
Index on Foreign Keys in PostgreSQL

Welcome to a weekly blog where I get to answer (like, really answer) some of the questions I’ve seen in the webinars I’ve presented lately. If you missed the latest one, PostgreSQL Performance Tuning Secrets, it might be helpful to give some of it a listen before or after you read this post. Each week, I’ll dive deep into one question. Let me know what you think in the comments. 

We constantly hear that indexes improve read performance and it’s usually true, but we also know that it will always have an impact on writes. What we don’t hear about too often is that in some cases, it may not give any performance improvement at all. This happens more than we want and might happen more than we even notice, and foreign keys (FKs) are a great example. I’m not saying that all FK’s indexes are bad, but most of the ones I’ve seen are just unnecessary, only adding load to the system.

For example, the below relationship where we have a 1:N relationship between the table “Supplier” and table “Product”:

foreign keys index

If we pay close attention to the FK’s in this example it won’t have a high number of lookups on the child table using the FK column, “SupplierID” in this example, if we compare with the number of lookups using “ProductID” and probably “ProductName”. The major usage will be to keep the relationship consistent and search in the other direction, finding the supplier for a certain product. In this circumstance, adding an index to the FK child without ensuring the access pattern requires it will add the extra cost of updating the index every time we update the “Product” table.

Another point we need to pay attention to is the index cardinality. If the index cardinality is too low Postgres won’t use it and the index will be just ignored. One can ask why that happens and if that wouldn’t still be cheaper for the database to go, for example, through half of the indexes instead of doing a full table scan? The answer is no, especially for databases that use heap tables like Postgres. The table access in Postgres (heap table) is mostly sequential, which is faster than random access in spinning HDD disks and still a bit faster on SSDs, while b+-tree index access is random by nature.

When Postgres uses an index it needs to open the index file, find the records it needs and then open the table file, do a lookup using the page addresses it got from the indexes changing the access pattern from sequential to random and depending on the data distribution it will probably access the majority of the table pages, ending up in a full table scan but now using random access, which is much more expensive. If we have columns with low cardinality and we really need to index them we need to use an alternative to b-tree indexes, for example, a GIN index, but this is a topic for another discussion.

With all of that, we may think that FK indexes are always evil and never use them on a child table, right? Well, that’s not true either and there are many circumstances they are useful and needed, for example, the below picture has another two tables, “Customer” and “Order”:

FK child table

It can be handy to have an index on the child table “Order->CustomerId” as it’s common to show all orders from a certain user and the column “CustomerId” on the table “Order” will be used quite frequently as the lookup key.

Another good example is to provide a faster method to validate referential integrity. If one needs to change the parent table (update or delete any parent key) the children need to be checked to make sure that the relationship isn’t broken. In this case, having an index on the child’s side would help to improve performance. When it worths the index however is “load dependant”. If the parent key has many deletes it might be a case to consider, however, if it’s a mostly static table or mostly has inserts or updates to the other columns other than the parent key column then it’s not a good candidate to have an index on the children tables.

There are many other examples that can be given to explain why an index on the child table might be useful and worth the extra write cost/penalty.

Conclusion

The takeaway here is that we should not indiscriminately create indexes on all FKs because many of them will just not be used or so rarely used that they aren’t worth the cost. It’s better to initially design the database with the FKs but not the indexes and add them while the database grows and we understand the workload. It’s possible that at some point we find that we need an index on “Product->SupplierId” due to our workload and the index on “Order->CustomerId” isn’t necessary anymore. Loads change and data distribution as well, index shall follow them and not be treated as immutable entities.


As more companies look at migrating away from Oracle or implementing new databases alongside their applications, PostgreSQL is often the best option for those who want to run on open source databases.

Read Our New White Paper:

Why Customers Choose Percona for PostgreSQL

Luca Ferrari: New features in pgenv

$
0
0

pgenv 1.2 introduces a few nice features.

New features in pgenv

pgenv is a great tool to simply manage different binary installations of PostgreSQL.
It is a shell script, specifically designed for the Bash shell, that provides a single command named pgenv that accepts sub-commands to fetch, configure, install, start and stop different PostgreSQL versions on the same machine.
It is not designed to be used in production or in an enterprise environment, even if it could, but rather it is designed to be used as a compact and simple way to switch between different versions in order to test applications and libraries.

In the last few weeks, there has been quite work around pgenv, most notably:

  • support for multiple configuration flags;
  • consistent behavior about configuration files.


In the following, I briefly describe each of the above.

Support for multiple configuration flags

pgenv does support configuration files, where you can store shell variables that drive the PostgreSQL build and configuration. One problem pgenv had was due to the limitation of the shell environment variables: since they represent a single value, passing multiple values separated by spaces was not possible. This made build flags, e.g., CFLAGS hard to write if not impossible.
Since this commit, David (the original author) introduced the capability to configure options containing spaces. The trick was to switch from simple environment variables to Bash arrays, so that the configuration can be written as


PGENV_CONFIGURE_OPTIONS=(--with-perl--with-openssl'CFLAGS=-I/opt/local/opt/openssl/include -I/opt/local/opt/libxml2/include''LDFLAGS=-L/opt/local/opt/openssl/lib -L/opt/local/opt/libxml2/lib')


where the CFLAGS and LDFLAGS both contain spaces.
To be coherent, this also renamed a lot of _OPT_ parameters to _OPTIONS_ to reflect the fact that they now can contain multiple values.

Consistent behavior about configuration files

pgenv exploits a default configuration file when no specific PostgreSQL configuration is found. The idea is that, if you launch PostgreSQL version x, an .pgenv.x.conf file is searched for, and if not found, the command tries to load the configuration from a default file named .pgenv.default.conf.
However, when you delete the configuration, the system did remove also the default configuration.
Therefore, since this commit, there is more consistency in the usage of the config subcommand.
In particular, in order to delete the default configuration you have to specify config delete defauòt explicitly, since config delete will no more nuke your default configuration. Moreover, the config init command has been added, so that you can initialize the configuration and then modify it by means of the config write command. Why these two commands? Well, config init will create a “default” configuration file from scratch with current default settings, while config write will modify the specified configuration.

There is more…

I’m currently working at another change in the configuration subsystem, so that you can keep all the configuration files into a single directory. The idea is to ease the migration of pgenv to a different machine (e.g., a new one), keeping your own configuration.

Shaun M. Thomas: PG Phriday: Isolating Postgres with repmgr

$
0
0
In this weeks PG Phriday, High Availability Architect Shaun Thomas explores some of the more advanced repmgr use cases that will bring your Postgres High Availability game to the next level. [Continue reading...]

Hubert 'depesz' Lubaczewski: Does varchar(n) use less disk space than varchar() or text?

Andreas 'ads' Scherbaum: Pavel Luzanov

$
0
0
PostgreSQL Person of the Week Interview with Pavel Luzanov: I live in Moscow, and work at Postgres Professional. I am responsible for educational projects.

Laurenz Albe: Entity-attribute-value (EAV) design in PostgreSQL – don’t do it!

$
0
0

good (?) reasons to use an entity-attribute-value design
© Laurenz Albe 2021

Customers have often asked me what I think of “Entity-attribute-value” (EAV) design. So I thought it would be a good idea to lay down my opinion in writing.

What is entity-attribute-value design?

The idea is not to create a table for each entity in the application. Rather, you store each attribute as a separate entry in an attribute table:

CREATE TABLE objects (
   objectid bigint PRIMARY KEY
   /* other object-level properties */
);

CREATE TABLE attstring (
   objectid bigint
      REFERENCES objects ON DELETE CASCADE NOT NULL,
   attname text NOT NULL,
   attval text,
   PRIMARY KEY (objectid, attname)
);

CREATE TABLE attint (
   objectid bigint
      REFERENCES objects ON DELETE CASCADE NOT NULL,
   attname text NOT NULL,
   attval integer,
   PRIMARY KEY (objectid, attname)
);

/* more tables for other data types */

The name of the model is derived from the “att...” tables, which have the three columns: “entity ID”, “attribute name” and “value”.

There are several variations of the basic theme, among them:

  • omit the objects table
  • add additional tables that define “object types”, so that each type can only have certain attributes

Why would anybody consider an entity-attribute-value design?

The principal argument I hear in support of the EAV design is flexibility. You can create new entity types without having to create a database table. Taken to the extreme, each entity can have different attributes.

I suspect that another reason for people to consider such a data model is that they are more familiar with key-value stores than with relational databases.

Performance considerations of entity-attribute-value design

In my opinion, EAV database design is the worst possible design when it comes to performance. You will never get good database performance with such a data model.

The only use cases where EAV shines are when it is used as a key-value store.

INSERT

Inserting an entity will look like this:

INSERT INTO objects (objectid) VALUES (42);

INSERT INTO attstring (objectid, attname, attval)
VALUES (42, 'name', 'myobject');

INSERT INTO attint (objectid, attname, attval)
VALUES (42, 'start', 100),
       (42, 'end',   1000);

That means that we insert four rows into three tables and have four index modifications. Also, the three statements will require three client-server round trips. You can save on the round trips by using CTEs to turn that into a single statement, or by using the new pipeline mode of libpq. Still, it will be much more expensive than inserting a single table row.

DELETE

If you use cascading delete, you could do that in a single statement:

DELETE FROM objects WHERE objectid = 42;

Still, you will end up deleting four table rows and modifying four indexes. That’s much more work than deleting a single table row.

UPDATE

A single-column update could actually be faster with the EAV design, because only one small table row is modified:

UPDATE attint
SET attval = 2000
WHERE objectid = 42 AND attname = 'end';

But if you have to modify several columns, you will need to run several UPDATE statements. That will be slower than if you only had to modify a single (albeit bigger) table row.

SELECT

Querying the attributes of an entity requires a join:

SELECT as.attval AS "name",
       ai1.attval AS "start",
       ai2.attval AS "end"
FROM objects AS o
   LEFT JOIN attstring AS as USING (objectid)
   LEFT JOIN attint AS ai1 USING (objectid)
   LEFT JOIN attint AS ai2 USING (objectid)
WHERE objectid = 42
  AND as.attname = 'name'
  AND ai1.attname = 'start'
  AND ai2.attname = 'end';

Alternatively, you could run three separate queries, one for each attribute. No matter how you do it, it will be less efficient than a single-row SELECT from a single table.

Single-column aggregates

As an example for a query that might be faster with the EAV model, consider a query that aggregates data from a single column:

SELECT sum(attval) AS total
FROM othertab
   JOIN attint USING (objectid)
WHERE othertab.col = 'x'
  AND attint.attname = 'attendants';

With a covering index on attint(objectid, attname) INCLUDE (attval), this could be quite a bit faster than aggregating a column from a wider table.

More complicated queries

After these examples, it is clear that writing more complicated queries will be a pain with the EAV design. Imagine a simple join:

SELECT e1a1.attval AS person_name,
       e1a2.attval AS person_id,
       e2a1.attval AS address_street,
       e2a2.attval AS address_city
FROM attint AS e1a2
   JOIN attstring AS e1a1
      ON e1a2.objectid = e1a1.objectid
   LEFT JOIN attint AS e2a0
      ON e1a2.attval = e2a0.attval
   LEFT JOIN attstring AS e2a1
      ON e2a0.objectid = e2a1.objectid
   LEFT JOIN attstring AS e2a2
      ON e2a0.objectid = e2a2.objectid
WHERE e1a1.attname = 'name'
  AND e1a2.attname = 'persnr'
  AND e2a0.attname = 'persnr'
  AND e2a1.attname = 'street'
  AND e2a2.attname = 'city';

If you think that this query is hard to read, I agree with you. In a normal relational data model, the same operation could look like this:

SELECT person.name AS person_name,
       persnr AS person_id
       address.street,
       address.city
FROM person
   LEFT JOIN address
      USING (persnr);

You can guess which query will perform better.

But we need an entity-attribute-value design for flexibility!

Relational data models are not famous for their flexibility. After all, that is the drive behind the NoSQL movement. However, there are good ways to deal with variable entities.

Creating tables on the fly

Nothing keeps you from running statements like CREATE TABLE and CREATE INDEX from your application. So if there is a limited number of entity types, and each type has a certain number of attributes, you can easily model that with a traditional relational model.

Certain problems remain:

  • A data model that grows on the fly may not end up being well-designed. But that’s not different in the entity-attribute-value design.
  • If the application has to create tables, it needs permission to do so. But today, when many applications create their own database tables anyway, few people will worry about that.

Creating tables on the fly will only work well if the set of attributes for each entity is well-defined. If that is not the case, we need a different approach.

Using JSON for a flexible data model

PostgreSQL has extensive JSON support that can be used to model entities with a variable number of attributes.

For that, you model the important and frequently occurring attributes as normal table columns. Then you add an additional column of type jsonb with a GIN index on it. This column contains the “rare attributes” of the entity as key-value pairs.

When using a model like this, you should take care that attributes

  • used in joins
  • on which you need a database constraint
  • that you want to use in a WHERE condition with an operator different from “=

are modeled as regular table columns.

Conclusion

Avoid entity-attribute-value designs in your relational database. EAV causes bad performance, and there are other ways to have a flexible data model in PostgreSQL.


Need help with your data modeling? Find out about CYBERTEC’s data modeling services

The post Entity-attribute-value (EAV) design in PostgreSQL – don’t do it! appeared first on CYBERTEC.


Jonathan Katz: Using TimescaleDB with PGO, the open source Postgres Operator

$
0
0

One of the many reasons "the answer is Postgres" is due to its extensibility.

The ability to extend Postgres has given rise to an ecosystem of Postgres extensions that change the behavior of the database to support a wide range of interesting capabilities. At Crunchy Data we are big fans of PostGIS, the geospatial extender for Postgres.

Another extension we are asked about often is TimescaleDB.

TimescaleDB is an open-source extension designed to make SQL scalable for time-series data. Timescale, Inc., the company behind TimescaleDB, provides an Apache licensed community edition of TimescaleDB that is packaged as a Postgres extension that provides automated partitioning across time and space.

We are often asked about the potential to deploy the Apache licensed community edition of TimescaleDB as an extension within our Crunchy PostgreSQL for Kubernetes using PGO, the open source Postgres Operator. We announced that we added the Apache licensed "community edition" of TimescaleDB to PGO 4.7, and we have brought TimescaleDB into PGO v5.

Let us look at how you can deploy the TimescaleDB extension as part of an HA Postgres cluster native to Kubernetes using the PGO Postgres Operator.

Deploying TimescaleDB on Kubernetes with PGO

Luca Ferrari: pgenv `config migrate`

$
0
0

pgenv 1.2.1 introduces a different configuration setup.

pgenv config migrate

Just a few hours I blogged about some new cool features in pgenv, I completed the work about configuration in one place.
Now pgenv will keep all configuration files into a single directory, named config . This is useful because it allows you to backup and/or migrate all the configuration from one machine to another easily.
But it’s not all: since the configuration is now under a single directory, the single configuration file name has changed. Before this release, a configuration file was named like .pgenv.PGVERSION.conf, with the .pgenv prefix that both made the file hidden and stated to which application such file belongs to. Since the configuration files are now into a subdirectory, the prefix has been dropped, so that every configuration file is now simply named as PGVERSION.conf, like for example 10.4.conf.
And since we like to make things easy, there is a config migrate command that helps you move your existing configuration from the old naming scheme to the new one:


% pgenv config migrate
Migrated 3 configuration file(s) from previous versions (0 not migrated)
Your configuration file(s) are now into [~/git/misc/PostgreSQL/pgenv/config]


Let’s have fun with pgenv!

Luca Ferrari: Monitoring Schema Changes via Last Commit Timestamp

$
0
0

An ugly way to introspect database changes.

Monitoring Schema Changes via Last Commit Timestamp

A few days ago, a colleague of mine shown to me that a commercial database keeps track of last DDL change timestamp against database objects.
I began to mumble… is that possible in PostgreSQL? Of course it is, but what is the smartest way to achieve it?
I asked on the mailing list, because the first idea that came into my mind was to use commit timestamps.
Clearly, it is possible to implement something that can do the job using event triggers, that in short are triggers not attached to table tuples rather to database event like DDL commands. Great! And in fact, a very good explaination can be found here.
In this article, I present my first idea about using commit timestamps.
The system used for the test is PostgreSQL 13.4 running on Fedora Linux, with only myself connected to it (this simplifies following transactions). The idea is, in any case, general and easy enough to be used on busy systems.

Introduction to pg_last_committed_xact()

The special function pg_last_committed_xact() allows the database administrator (or an user) to get information about which transaction has committed last.
Let’s see this in action:


% psql -U luca -h miguel -c'select pg_last_committed_xact();'   testdb
ERROR:  could not get commit timestamp data
HINT:  Make sure the configuration parameter "track_commit_timestamp" is set.


First of all in order to get information about the committed transaction timestamps, there must be the option track_commit_timestamp configured.
Turning on and off the parameter will not provide historic data, that is even if you had the parameter on and then you turned off, you will not be able to access collected data.
Let’s turn on the parameter and see how it works. The track_commit_timestamp is a parameter with the postmaster context, and therefore requires a server restart!


% psql -U postgres -h miguel \-c'ALTER SYSTEM SET track_commit_timestamp to "on"; '\
       testdb
ALTER SYSTEM
% ssh luca@miguel 'sudo systemctl restart postgresql-13'


In the above I restarted a remote system via ssh, of course you are free to configure the parameter and restart the cluster with your preferred (or available) method.
It is now time to see which information we can get with track_commit_timestamp turned on.


testdb=>SELECTtxid_current();-[RECORD1]+-------------txid_current|380316302458testdb=>SELECT*FROMtxid_status(380316302457),pg_last_committed_xact();-[RECORD1]------------------------------txid_status|committedxid|2359180410timestamp|2021-11-2004:28:50.223275-05


Let’s dissect the above example:

  • txid_current() simulates a new transaction in one row, because the function gets a new xid (transaction identifier) even if not used for effective work;
  • txid_status() accepts a xid identifier and returns a string with the status of the transaction, and as shown, the fake transaction 380316302458 results in status committed;
  • pg_last_committed_xact() now is able to report both the xid and the timestamp at which the last transaction has committed, that is the transaction 380316302458 committed at 2021-11-20 04:28:50.223275-05.


Wait a minute: pg_last_committed_xact() states that the last committed transaction is 2359180410, not 380316302458. What is happening?
Wrap-around is on its way!
The above system has done a so called xid wraparound, that is normal situation in a long running PostgreSQL instance. What this means, is that txid_current() is resturning a bumped value that is, somehow, an absolute value. However, PostgreSQL “reasons” in terms of values modulo 2^32, therefore we must take into account this possible difference.
The above example therefore becomes:


testdb=>SELECTtxid_current()asxid_absolute,mod(txid_current(),pow(2,32)::bigint)asxid;-[RECORD1]+-------------xid_absolute|380316302460xid|2359180412testdb=>SELECT*FROMtxid_status(380316302460)asxid_abs_status,txid_status(2359180412)asxid_status,pg_last_committed_xact();-[RECORD1]--+------------------------------xid_abs_status|committedxid_status|xid|2359180412timestamp|2021-11-2004:34:54.531106-05


The above demonstrates that transactions 380316302460 and 2359180412 are the same, according to PostgreSQL. However, txid_status() requires an “absolute” xid number (note how the short transaction number does not report any status), while pg_last_committed_xact() reasons in terms of “running” numbers, i.e., the modulo ones.
There is another interesting function to keep in mind: pg_xact_commit_timestamp() that, given a transaction identifier, returns the known commit timestamp:


testdb=>SELECT*FROMpg_xact_commit_timestamp(2359180412::text::xid),pg_last_committed_xact();-[RECORD1]------------+------------------------------pg_xact_commit_timestamp|2021-11-2004:34:54.531106-05xid|2359180412timestamp|2021-11-2004:34:54.531106-05


As you can see, the timestamp for the same transaction is always the same. Note that a bigint requires a conversion to text before being translated into a xid.

Tracking DDL Commands

Every table in PostgreSQL has two hidden fields that track the transaction ranges: xmin indicates the transaction that created a tuple, while xmax indicates the transaction that invalidated the tuple. This is used in the MVCC (Multi Version Concurrency Control) machinery that I’m not going to discuss here, so trust that everything works just fine.
The keypoint here is: every table has fields that track the transaction that generated the tuple. This applies also to system catalogs, and in particular (with regard to this article) to pg_class.
Having stated that, and knowing that every time a DDL command applies, something is changed in the system catalogs, it is therefore possible to track when changes did happen on a particular database object or table.
Let’s see this in action:


testdb=>BEGIN;BEGINtestdb=>SELECTtxid_current()asxid_absolute,mod(txid_current(),pow(2,32)::bigint)asxid,current_timestamp;-[RECORD1]-----+------------------------------xid_absolute|380316302463xid|2359180415current_timestamp|2021-11-2005:11:56.343542-05testdb=>CREATETABLEddl_test(pkintgeneratedalwaysasidentity,ttext);CREATETABLEtestdb=>COMMIT;COMMIT


At timestamp 2021-11-20 05:11:56 the table ddl_test has been created. Since every DDL command in PostgreSQL is transactional, it is possible to track the transaction that committed such DDL (in the above example, 380316302463 alis 2359180415).
Let’s query pg_class to get information about last DDL commands on ddl_test table:


testdb=>SELECTage(xmin)astransaction_before,xminasit_was_transaction_number,pg_xact_commit_timestamp(xmin)asmodified_at,relnameastableFROMpg_classWHERErelkind='r'ANDrelname='ddl_test';-[RECORD1]-------------+------------------------------transaction_before|1it_was_transaction_number|2359180415modified_at|2021-11-2005:12:21.359126-05table|ddl_test


The above queries tells us that 1 transaction ago the transaction number 2359180415 modified the structure of ddl_test at timestamp 2021-11-20 05:12:21.359126-05**. <br/> **Everything seems fine except for the timestamp**: the transaction timestamp is not really the same as reported by pg_xact_commit_timestamp()`. The reason for this is that the moment a transaction commits is not the same as the transaction is consolidated, therefore there could some offset and lag. However, checking deeper we can see that data is coherent:


testdb=>SELECT*FROMpg_last_committed_xact();-[RECORD1]----------------------------xid|2359180415timestamp|2021-11-2005:12:21.359126-05


So this is a first ugly but pretty much unexpensive way to track changes to the table.


Let’s now add a column to the table, so to see if this machinery can work:


testdb=>BEGIN;BEGINtestdb=>SELECTtxid_current()asxid_absolute,mod(txid_current(),pow(2,32)::bigint)asxid,current_timestamp;-[RECORD1]-----+------------------------------xid_absolute|380316302464xid|2359180416current_timestamp|2021-11-2005:21:03.089031-05testdb=>ALTERTABLEddl_testADDCOLUMNtttext;ALTERTABLEtestdb=>COMMIT;COMMITtestdb=>SELECT*FROMpg_last_committed_xact();-[RECORD1]----------------------------xid|2359180416timestamp|2021-11-2005:21:32.376468-05


Transaction 2359180416 at timestamp 2021-11-20 05:21:32.376468-05 committed the ALTER TABLE. Let’s run again our query against pg_class:


testdb=>SELECTage(xmin)astransaction_before,xminasit_was_transaction_number,pg_xact_commit_timestamp(xmin)asmodified_at,relnameastableFROMpg_classWHERErelkind='r'ANDrelname='ddl_test';-[RECORD1]-------------+------------------------------transaction_before|1it_was_transaction_number|2359180416modified_at|2021-11-2005:21:32.376468-05table|ddl_test


Therefore we now know when the table was last touched by a DDL command.

Going Deeper: Introspection Against Columns

From the above we now know when a change happened to our table, but we don’t know which attribute has been changed. It is possible to push the same logic against other parts of the system catalog, for example pg_attribute that handles information about single table columns.
Here it the example applied to our demo table:


testdb=>SELECTxmin,attname,age(xmin),pg_xact_commit_timestamp(xmin)FROMpg_attributeWHEREattrelid='ddl_test'::regclass;xmin|attname|age|pg_xact_commit_timestamp------------+----------+-----+-------------------------------2359180415|tableoid|2|2021-11-2005:12:21.359126-052359180415|cmax|2|2021-11-2005:12:21.359126-052359180415|xmax|2|2021-11-2005:12:21.359126-052359180415|cmin|2|2021-11-2005:12:21.359126-052359180415|xmin|2|2021-11-2005:12:21.359126-052359180415|ctid|2|2021-11-2005:12:21.359126-052359180415|pk|2|2021-11-2005:12:21.359126-052359180415|t|2|2021-11-2005:12:21.359126-052359180416|tt|1|2021-11-2005:21:32.376468-05


All the columns except tt have been created by the very same transaction at the very same timestamp, while tt has been touched from another transation 11 minutes after.
The above is not very useful, so it is possible to improve sligthly the query into the following one:


testdb=>SELECTarray_agg(attname)ascolumns,current_timestamp-pg_xact_commit_timestamp(xmin)aswhenFROMpg_attributeWHEREattrelid='ddl_test'::regclassGROUPBYpg_xact_commit_timestamp(xmin);columns|when------------------------------------------+-----------------{tableoid,cmax,xmax,cmin,xmin,ctid,pk,t}|00:19:38.202794{tt}|00:10:27.185452


That reports all the column “touched” at the very same time and how many time has elapsed from the last change. For example, the column tt has been changed 10 minutes ago, while the other columns 19 minutes ago.
Let’s do more changes to our table and see what happen; please note that everything is executed in autocommit mode:


testdb=>ALTERTABLEddl_testADDCOLUMNttttext;ALTERTABLEtestdb=>ALTERTABLEddl_testALTERCOLUMNttSETDEFAULT'FizzBuzz';ALTERTABLEtestdb=>ALTERTABLEddl_testDROPCOLUMNt;ALTERTABLEtestdb=>SELECT*FROMpg_last_committed_xact();xid|timestamp------------+------------------------------2359180419|2021-11-2005:36:48.54285-05


If we inspect again pg_attribute we have:


testdb=>SELECTarray_agg(attname)ascolumns,current_timestamp-pg_xact_commit_timestamp(xmin)astime_ago,pg_xact_commit_timestamp(xmin)aswhenFROMpg_attributeWHEREattrelid='ddl_test'::regclassGROUPBYpg_xact_commit_timestamp(xmin);columns|time_ago|when----------------------------------------+-----------------+-------------------------------{tableoid,cmax,xmax,cmin,xmin,ctid,pk}|00:26:25.685984|2021-11-2005:12:21.359126-05{ttt}|00:04:08.244367|2021-11-2005:34:38.800743-05{tt}|00:02:31.791574|2021-11-2005:36:15.253536-05{........pg.dropped.2........}|00:01:58.50226|2021-11-2005:36:48.54285-05testdb=>SELECTage(xmin)astransaction_before,xminasit_was_transaction_number,pg_xact_commit_timestamp(xmin)asmodified_at,relnameastableFROMpg_classWHERErelkind='r'ANDrelname='ddl_test';-[RECORD1]-------------+------------------------------transaction_before|3it_was_transaction_number|2359180417modified_at|2021-11-2005:34:38.800743-05table|ddl_test


There are some interesting things in the above output. First of all, pg_class reports only the changes related to new attributes, not the dropped ones or the internally changed. On the other hand, pg_attribute reports information about every single attribute, including those changed in a “minor” mode (the SET DEFAULT for instance).
Please note how the dropped column (namely t) is no more visible, even if there is pg.dropped.2 that clearly refers to such column. In the above example it is easy enough: only one column has been dropped in a single user instance, however in a more concurrent system it is hard to get track about the information related to dropped attributes. For more information about the dropped columns, please see my previous article about why PostgreSQL does not reclaim disk space on column drop.

What about VACUUM?

The VACUUM FULL command totally rewrites a table, therefore this means that every information about transactions that have “touched” systsem catalogs are updated by a newer transaction. This does not mean that VACUUM is a transactional command, rather it happen to do a CREATE TABLE pretty much as we did manually.


testdb=>VACUUMFULLddl_test;VACUUMtestdb=>SELECTage(xmin)astransaction_before,xminasit_was_transaction_number,current_timestamp-pg_xact_commit_timestamp(xmin)asmodified_since,relnameastableFROMpg_classWHERErelkind='r'ANDrelname='ddl_test';transaction_before|it_was_transaction_number|modified_since|table--------------------+---------------------------+-----------------+----------1|2359180423|00:00:02.615678|ddl_test(1row)testdb=>SELECTarray_agg(attname)ascolumns,current_timestamp-pg_xact_commit_timestamp(xmin)aswhenFROMpg_attributeWHEREattrelid='ddl_test'::regclassGROUPBYpg_xact_commit_timestamp(xmin);columns|when----------------------------------------+-----------------{tableoid,cmax,xmax,cmin,xmin,ctid,pk}|00:50:03.972343{ttt}|00:27:46.530726{tt}|00:26:10.077933{........pg.dropped.2........}|00:25:36.788619


It is interesting to note an apparent inconsistency: the table has been modified 2 seconds ago while the columns have been touched between 25 and 50 minutes ago. How is that possible? Well, VACUUM FULL has rewritten the table but metadata about columns did not change.
In short, this is an indicator about VACUUM FULL execution: if the change time of a table is earlier than that of its columns probably vacuum ran. The correct way to know whenVACUUM FULL run is to inspect appropriate catalogs like pg_stat_user_tables. In any case, combining these information help understanding what happened into the system.


Let’s see something about VACUUM:


testdb=>SELECTage(xmin)astransaction_before,xminasit_was_transaction_number,current_timestamp-pg_xact_commit_timestamp(xmin)asmodified_since,relnameastableFROMpg_classWHERErelkind='r'ANDrelname='ddl_test';-[RECORD1]-------------+----------------transaction_before|11it_was_transaction_number|2359180423modified_since|00:20:41.953205table|ddl_testtestdb=>VACUUMddl_test;VACUUMtestdb=>SELECTage(xmin)astransaction_before,xminasit_was_transaction_number,current_timestamp-pg_xact_commit_timestamp(xmin)asmodified_since,relnameastableFROMpg_classWHERErelkind='r'ANDrelname='ddl_test';-[RECORD1]-------------+----------------transaction_before|11it_was_transaction_number|2359180423modified_since|00:20:51.272209table|ddl_test


The result is that pg_class is unchanged, with regard to the transaction that generated the tuple.
Why?
Since VACUUM is a command that cannot be run within a transaction, it cannot be considered in the described workflow, therefore it is like an invisible command (with regard to transactions).

What about ANALYZE?

Unlike VACUUM, the command ANALYZE can be run in a transaction, and this is clearly shown by the age result increasing by one:


testdb=>SELECTage(xmin)astransaction_before,xminasit_was_transaction_number,current_timestamp-pg_xact_commit_timestamp(xmin)asmodified_since,relnameastableFROMpg_classWHERErelkind='r'ANDrelname='ddl_test';-[RECORD1]-------------+----------------transaction_before|14it_was_transaction_number|2359180423modified_since|01:37:54.483495table|ddl_testtestdb=>ANALYZEddl_test;ANALYZEtestdb=>SELECTage(xmin)astransaction_before,xminasit_was_transaction_number,current_timestamp-pg_xact_commit_timestamp(xmin)asmodified_since,relnameastableFROMpg_classWHERErelkind='r'ANDrelname='ddl_test';-[RECORD1]-------------+----------------transaction_before|15it_was_transaction_number|2359180423modified_since|01:38:05.267443table|ddl_test


What is not changing in the above example is the transaction that generated the tuple in pg_class: it is always 2359180423, before and after the ANALYZE command (that did run in a transaction).
Why?
Well, ANALYZEhits another table: pg_statistic. Such table is the root of all statistical information like pg_stat_user_tables and friends, and is the one updated by ANALYZE. This can be clearly inspected with a similar query:


testdb=#SELECTxmin,age(xmin),staattnumFROMpg_statisticWHEREstarelid='ddl_test'::regclass;xmin|age|staattnum------------+-----+-----------2359180437|1|12359180437|1|32359180437|1|4


Please note that the query has been run as a superuser, because of the need of privileges. The result set is made of three rows because there are three “active” (i.e., not dropped) columns within the table, and all of them has been modified (from a statistic point of view) by ANALYZE, that ran in transaction 2359180437 that is now one transaction far (i.e., it was the previous transaction).

Conclusions

Keeping track of commit timestamps could be useful for database introspection, at least to get a glance at when things changed.
The same trick can also be used against regular table tuples, to get an idea of when a tuple appeared in that form in the table.
However, this is not a very good approach, and something much more complex can be built like using already mentioned event triggers.
But hey, this is PostgreSQL: you can extend it in pretty much any direction!

Hubert 'depesz' Lubaczewski: Waiting for PostgreSQL 15 – Add assorted new regexp_xxx SQL functions.

Regina Obe: PostGIS 3.2.0beta2 Released

$
0
0

The PostGIS Team is pleased to release the second beta of the upcoming PostGIS 3.2.0 release.

Best served with PostgreSQL 14. This version of PostGIS utilizes the faster GiST building support API introduced in PostgreSQL 14. If compiled with recently released GEOS 3.10.1 you can take advantage of improvements in ST_MakeValid and numerous speed improvements. This release also includes many additional functions and improvements for postgis_raster and postgis_topology extensions.

Continue Reading by clicking title hyperlink ..
Viewing all 9640 articles
Browse latest View live


<script src="https://jsc.adskeeper.com/r/s/rssing.com.1596347.js" async> </script>